Saturday, 15 June 2013

Configure Google Analytics for Google Sites


Curious where your site's traffic is coming from or how people navigate around your site? You can add Google Analytics to your site to help monitor your site's traffic:

Creating a new account in Google Analytics

  1. If you have already signed up for Google Analytics or you have a Google Account (in other words, you use any other Google service, such as Google Sites), sign in to your account.new window If you do not have an account, go to the Google Analytics signup pagenew window click Sign up now, and follow the prompts to create a Google Analytics account.
  2. We recommend you create a new Analytics account for each of your sites. On theOverview, select Create new account... from the My Analytics Accounts drop-down menu.
  3. On the New Account Signup page, enter the URL of your site:
    • If you've mapped your Google site to another web address, such as www.example.com, enter that address.
    • If you haven't mapped your site to another web address, you need to enter your full site address, such as sites.google.com/site/example.
  4. Also on the New Account Signup page, enter what you want to call this account in the Account Name box, then select your country and time zone. Then click "Continue."
  5. On the Accept User Agreement page, read the Google Analytics Terms of Service. If you agree with these, click the box next to Yes, I agree to the above terms and conditions then click "Create New Account."
  6. The next page contains a javascript code. You can ignore this code and click "Save and Finish."

Linking your Google Analytics account and your Google Site

  1. After you create your new Google Analytics account, you will be directed to you Google Analytics profile screen, where the name of your tracked site should appear, followed by a Google Analytics account number in the format, 'UA-XXXXXXXX-X.' Copy this code -- known as your Analytics Web Property ID -- and go to the site that you want to track with Google Analytics.
  2. On your site, click the More Actions drop-down menu and select Manage Site.
  3. Under the Site Settings section, click General.
  4. Click the box next to Enable Google Analytics for this site and then enter your Analytics Web Property ID in the associated box.
  5. Click "Save changes."

Add MP3 Files to Blogger

One nagging theme that consistently bothers Blogger users is the lack of storage available for file types other than images and videos when attempting to expand your blog. I don't know how many times I've seen users asking for upload storage for PowerPoint slides, PDF files, databases, etc. Probably the single most popular request is "how can I upload a MP3 file to Blogger and embed it in a flash player?" without some odd widget or custom call-out. The reason why the MP3 request is called out so often is mainly due to the desire to have either music or podcasts directly embedded in your posts.

What many Blogger users don't realize is that by registering as a Google user, you have many of their tools at your disposal including the not so obvious ability to utilize free Google storage (which translates directly to the ability to upload MP3 files

Now, uploading a MP3 file to Blogger is not a direct upload through the Blogger interface but is very easy with just a few steps to get you there quickly. So, let's get started!!

Creating a Google Site for MP3 Storage


So, just what is a Google Site? Sites is a free website building tool that Google picked up as an acquisition some years back. It is not overly popular but does have some interesting capabilities. You can use it as a standalone tools to build full, mostly static websites without any hosting fees. In our case we're only using it as a background placeholder.


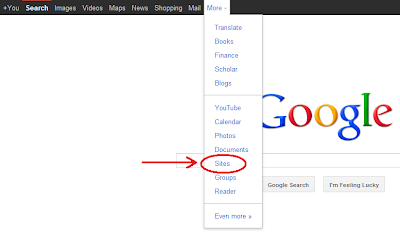
The first thing you're going to want to look for is the Google Sites menu item. It is a bit hidden under the More menu selection as shown here:

Google Sites for Blogger
Simply go ahead and choose 'Sites' to get started. You're really not going to use the site builder to build a full website at this point (though you could if wanted), just utilizing some of the storage functionality that Google provides with this tool.

Select the menu button 'CREATE' to make a background site for your Blogger blog:

Create a Google Sites page

This will lead you to the next page that will allow you to name your site and associated themes if you want. The key at this point is to just use the default 'Blank Template' that is preselected. I like to use the name 'media' or 'mediafiles' if my goal is to have Blogger use MP3 music or podcasts:

Naming a Google Sites website for Blogger mp3 files
Go ahead and press 'CREATE' to have Sites kick off the website build. In a second or two you should see something like this which is the left pane of the newly created website:

Google Sites default site

You now have the website shell ready to land your MP3 files. But, the default pages are only static ones at this point without any ability to upload or store files. For the last phase of this Part 1 you need to create a certain type of webpage called a 'File Cabinet'.

Creating the Blogger MP3 File Cabinet


The next step is adding a web page to your site. Go up to the far right menu item in Sites and select the 'New page (c)' icon button:

Blogger mp3 file cabinet

You'll be prompted with a page setup dialog that will need to 'Name your page:' and set the page type like so - be sure to use the numbered order to setup the page correctly. I prefer to create a File Cabinet page called mp3 to set the file types. You can call it whatever makes sense to you:

Creating a mp3 file cabinet

Go ahead and press 'CREATE' to build the new webpage. Your site should return looking something like this:

Default site for Blogger mp3 files


You've now created the needed shell to get your MP3 files to some free storage from Blogger. Before you start working with this site, however, you need to follow one last step - setting the visibility of the webpages to be Public.

In this upper right menu choose the 'More' dropdown button to select the 'Sharing and Permissions' option:

Set sites permissions


Once you've selected it, you'll be in the Manage Site section. You'll want to select the visibility permission to allow these pages to be fully 'Public on the web' like so:


Done!! You're now ready to start using Google Sites for your Blogger MP3 files! 

Uploading MP3 Files to Google Sites

If you've left your Google Site since the last tutorial, go back and log into Sites again. You should see the default Sites screen with the new 'mediafiles' site ready from Part 1:

Media files for Google Sites


Go ahead the click on the 'mediafiles' site to get to the pages within--you will open a new window defaulting to the Home page like so:

mp3 files section for Blogger

Your custom file uploading page (called mp3 here) is ready for your files. Go ahead and select the mp3 page title in the left menu above to get the to files page where you can start the uploads. The small 'Add files' button is located near the middle of the page as circled below. This is where you can select the files you want to upload:


Add mp3 files to Google Sites


When you select the files you should see the upload dialog box:

Upload mp3 files to Sites for Blogger
Continue repeating this step to upload all of the files you need. Take care, however. Google does have a storage limit on Sites of only 100MB per site andonly 20MB per file. So, if you're uploading music, that limits you to about 25 songs. For podcasts take care to reduce your audio bit rate to get more efficiency in storage. I'm sure you could create more sites to raise that limit but I haven't tried it personally.

Here's what your mp3 site page should look like now:

Blogger media files


The mp3 file I added was from a Royalty Free music website. However, in order to use the file I have to give the artist create like this:
  • Future Gladiator Kevin MacLeod (incompetech.com) Licensed under Creative Commons "Attribution 3.0" http://creativecommons.org/licenses/by/3.0/
Since the Google Sites page is public, you might want to consider what type of license is needed for the mp3 files you are uploading. Be sure to give the artist or podcast credit both on your Blogger site as well as your Google site if required by the license. I added the very same credit in the comments of the Google site too.

Embedding an Audio Player in Blogger


The final step in this entire process is to find an audio player that you can utilize to actually stream the MP3 data to your users. Typically this is done using an Adobe Flash/Shockwave player. The player just needs to be embedded as code in an HTML widget or directly in a Blogger blog post.

Fixed as of Sept 2012 - At one time Google provided a Flash audio player directly from their Google Reader site. As of June 2012 - this was removed much to the dismay of many bloggers. They may or may not add this back. I'm going to leave this section within this post for now in case Google decides to add their player back. The best guess out there right now is that Google is migrating much of their Reader functionality to Google Play - their new multi-media site.

Luck has it that Google has just the code you need! As part of the Google Reader application, there is a player widget you can reference directly from other Google tools. Important note, however: I haven't found any specific wording that Google sanctions this from Blogger. But, many people do it and I doubt that Google would pull the plug on the widget for its use in Reader.

Given that, here is the widget code you need to copy and paste:

<embed
flashvars="audioUrl=your-google-sites-link-here"
height="27"
pluginspage="http://www.macromedia.com/go/getflashplayer"
quality="best"
src="http://www.google.com/reader/ui/3523697345-audio-player.swf" type="application/x-shockwave-flash"
width="400"
wmode="transparent">
</embed>

Note that the part that says 'your-google-sites-link-here' needs to be the full URL of your Google Site MP3 file. The easiest way to get to this is to right-click on the small, down-arrow located next to the file on the far bottom right of your file page:

Download streaming link for Blogger

Once you right-click on it, you should see a menu item that says 'Copy Link Location'. Go ahead and choose that to paste into your copied code above like so:

<embed
flashvars="audioUrl=http://sites.google.com/a/bloggertipspro.com/mediafiles/mp3/Future%20Gladiator.mp3"
height="27"
pluginspage="http://www.macromedia.com/go/getflashplayer"
quality="best"
src="http://www.google.com/reader/ui/3523697345-audio-player.swf" type="application/x-shockwave-flash"
width="400"
wmode="transparent">
</embed>

If you take a close look at my URL you'll see that I removed the 's' from thehttps in the link. Google Sites uses a secure http connection by default. However, since we made the page public you can alter the 'https' to 'http'. I also removed the extended attributes on the link '?attredirects=0&d=1'although this doesn't really matter--it play either way.

And finally, here is the actual example embedded into this post! The file is fairly large so you might get a few second delay before it plays. Enjoy!!!

 
One thing you need to be concerned with is cross-domain scripting security with this configuration. Since Blogger is attempting to call the MP3 files on a Google Sites domain you'll find that many companies or browser defaults will not allow this configuration. For example, this domain is bloggertipspro.com and the MP3 sample is located at sites.google.com (or google.com). Many security configurations don't like this since external domains can be untrusted from the original domain.

Until Google allows files uploaded directly to Blogger you'll have to live with this limitation. In these examples you may or may not see or hear the audio samples depending on where you are accessing this web page.

Option 1 - Embedding a Custom Media Player in Blogger


I did some searching online and found the following downloadable player calledDewPlayer. The key to using DewPlayer is to download the dewplayer Flash file and upload it to your same Google Sites MP3 page as you did with your files in Part 2. Follow the same instructions to upload the file 'dewplayer.swf' to the MP3 folder like this:


As you can see I've uploaded both the 'dewplayer.swf' and 'dewplayer-rect.swf' files. Each looks a bit different. Once you've uploaded the file, place this code in your post as HTML where you want it:


<div>
<object type="application/x-shockwave-flash" data="http://sites.google.com/a/bloggertipspro.com/mediafiles/mp3/dewplayer.swf" width="240" height="20" id="dewplayer" name="dewplayer">
<param name="movie" value="dewplayer.swf" />
<param name="flashvars" value="mp3=http://sites.google.com/a/bloggertipspro.com/mediafiles/mp3/Future%20Gladiator.mp3" />
<param name="wmode" value="transparent" />
</object>
</div>

Hopefully, your security settings should allow this to be visible here:


Option 2 - Using the Yahoo Embedded Media Player

Another option is to use the javascript media player provided by Yahoo. This works pretty well, however, I don't like the player on the left side of the window. Just paste this code with your mp3 file where you want the player:


<a href="http://sites.google.com/a/bloggertipspro.com/mediafiles/mp3/Future%20Gladiator.mp3">Play Song</a>
<script type="text/javascript" src="http://mediaplayer.yahoo.com/js">
</script>

Play Song


Option 3 - Using an IFrame of a Google Site Widget

With Google Sites users were allowed to create widgets for various functions. Fortunately, an industrious person developed this iframe plug-in. This is one of the few options that works better with browser security because the frame is a window within a window - copy and past this code if you like it:


<iframe title="Embed Music" width="300" height="45" scrolling="no" frameborder="0" id="1321430542" name="1321430542" allowtransparency="true" class="igm" src="//urlaacjrode9jse93p741t2n1ibbufaq-a-sites-opensocial.googleusercontent.com/gadgets/ifr?url=http://hosting.gmodules.com/ig/gadgets/file/105629041657992777031/embed-music.xml&amp;container=enterprise&amp;view=default&amp;lang=en&amp;country=ALL&amp;sanitize=0&amp;v=6ced7fd38a9bccd&amp;up_hide&amp;up_loop=false&amp;up_auto=false&amp;up_bg&amp;up_mime=audio/mpeg&amp;up_url=http://sites.google.com/a/bloggertipspro.com/mediafiles/mp3/Future%20Gladiator.mp3&amp;libs=core:dynamic-height:idi&amp;mid=144&amp;parent=https://sites.google.com/site/mori79/html-gadgets/media-players#st=e%3DAIHE3cCkXTmVvxP0ZRAHEXp17OlOvBFg6Xw008LDGZSE%252F1fBKexUW%252BeMXTo%252FSYAabcN%252FtKDMOM8MqiEQfTIjSiO6W77yTW9QlA%252F%252Bz7Yl0dVKwOWuo5uu7TPbl%252FtDNjfh5HX0J%252FceG%252Fjn%26c%3Denterprise&amp;rpctoken=1639199637196496882"></iframe>

Option 4 - Wait for HTML5 Compatible Browsers

HTML5 was developed with multimedia in mind. Some of the newer browsers have the new <audio> tag that will, in the future, allow you to play media without a Flash player. However, this is still cross-domain scripting which may be blocked:


<audio controls="controls">
  <source src="http://sites.google.com/a/bloggertipspro.com/mediafiles/mp3/Future%20Gladiator.mp3" type="audio/mpeg" />
Your browser does not support this audio
</audio>